quinta-feira, 20 de setembro de 2012

Paper Toy - Luffy: One Piece

Ele vai ser o rei dos piratas

Corajoso, desligado, forte, guloso, obstinado, brincalhão
Luffy é uma soma de antagonices, que o tornam um personagem inesquecível, e fazem uma desenho que para mim tem o melhor do humor e das lutas.

We are on the cruise, we are.

Courageous, distracted, strong, greedy, obstinate, playful
Luffy is all antagonistic, and its made a unforgettable character, and made a toon tha, for me, is the best in humor and also in fights

link para download link atualizado
download english file


Paper toy - how to do - Luffy


1)The belt is easy, but some explanation will probably help you, first cut the bell like the image
2)score the folder and fold to inside   -    3) paste   -   4)cut following the picture   -   5) and it´s ready
6) separe the pieces and score the folders   -   7) cut the pieces


green line:  fold to inside
blue line fold to outside


1) the hand is just a cube   -   2) to mount the forearm is easy, just follow the numbers
3) the arm have arrows to indicate the front side   -   4) to mount the sleeve follow the steps
5) the arms are ready, pay attention in the diferencer betwen left and right. uses your hand like a reference.


1) to mount the legs is easy   -   2) pay attention in the sides, the shins and the feets must be turned to outside
3) the pants is a litlle harder, again, follow the nunbers, pay special attention in number 1, paste in base
4) the legs are ready, remeber to paste the both sides of the pants before the others pieces.


1) paste the hat brim
2) the last tab in face (after the botton of head) must be pasted in the back of the chin
3) all the pieces ready, lets go to the body


1) the body is the harder piece of this toy, again just follow the numbers, attention to the outsides folders
just be patient   -   2 to mount the tab of jacket remeber the sleeve
3) almost done, paste one side of the tab in body first, wait fill seconds, and after, paste the other side


1) mount the parts separately   -   2) paste the sleeves between the arms and the forearms
3) don´t paste the arms symmetrically, a little diference will be cooler.
4) again, pay attention in diferences between right and left


qualquer dúvida tire nos comentários ou pelo perfil cara do papel
any questions, use the comments or ask in facebook caradopapel

quinta-feira, 13 de setembro de 2012

Wolverine


Sou o Melhor naquilo que faço, e o que faço não é nada bonito.

Se você conhece a frase em cima, com certeza você conhece o herói canadense de regeneração incrível, ossos e garras recobertas de admantium e bom para puxar briga.
Logan, o Wolverine é nosso primeiro papertoy, não se assuste pela aparência do brinquedo, pois montá-lo é mais fácil do que parece.

Siga nosso passo-a-passo e divirtá-se.
download

I'm the best at what I do, and what I do isn't very nice

Logan, Wolverine is our first papertoy, do not be scared by the appearance of the toy, because mounting it  it's easier than it appears.

Follow our step-by-step and enjoy.
download in english

1)To assemble your Wolverine find a a clean and quiet place, without wind. Find either a trasher and a dish to use the glue.
2)You will need a ruler and something to scores the folds, glue, toothpicks and a scissor
3) before cut the pieces, score the folders. This is really important

1) Cut the body , be carefull with the small parts.
2) Make  the folds, and pay atenttion, someones you must fold to outside, they are marked
3) The chest also has some folds to outside
4) Start to paste by the nunber 1, and follow the sequence
5) the last part is teh top of the body, use glue in al the tabs
6) You body must be like this

1) attention again to the folds to outside
2) assemble the head is eassy
3) in mask we have some tricks, fold to inside in the arrow, and paste one side in other before cut
4)cut following the draw in the front, forget about the back
5) paste the mask in front of the head, and your job will be done, for now

1) follow the instruction to assemble the claw, trey must be like this
2) paste de claw in the back of the hand, be smart, this hand is the right, this is important
3) paste the forearm, the text arm (or Braço, if you downloaded the brazilian file) must be for upside
4) the hand with the claw must be like this, don´t forget, the fingers must be turned to inside
5) paste the arm with the text body (or "corpo") to the same side then the fingers, the other arm will be the oposite.


1) the legs (and boots) hasn´t secrets, but insted follow the numbers yoou could prefer assemble ina a diferent order.
2) paste the boots in leg, like is in the picture, there´s no difference betwen right and left.
3) prepare the bootpoints like you made the mask
4) almost finished, paste de head in the body
5) now paste the legs and the arms, remember wich one is the left and the right.


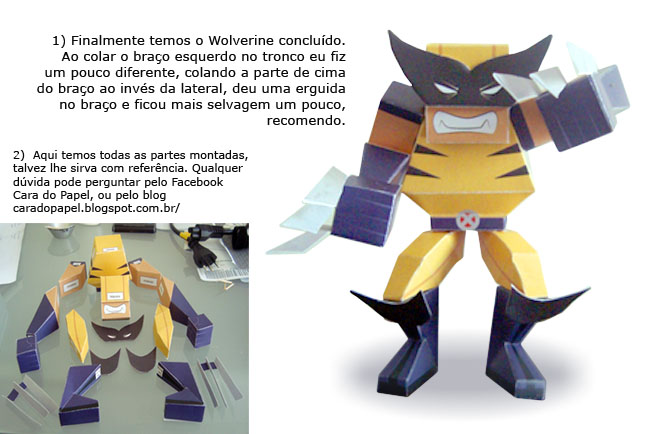
1) And we´re done. I paste the left arm a litlle diferent than the original project, pasting the upside of the arm instead the side, the result is a high arm, and a more savage expression, I recomend it.
2) here we have a image to all the pieces assemble maybe it halps you. Any questions asks by the facebook www.facebook.com/caradopapel or by my blog caradopapel.blogspot.com.br/

Sorry about my english ;)

Dicas de iniciante

Por onde começar?


O sábio Chapeleiro Louco Já dizia: "Comece pelo princípio"
Então comecemos pelo princípio

Materias básicos
- 2 réguas (de preferencia uma de metal)
- Cola branca e de bastão
- Tesoura boa (com ponta, a não ser que você seja criança, nesse caso, sem ponta)
- Palitos roliços de madeira (vulgo palito de dente)
- Disposição , animo, pensamento positivo e aquelas coisas meladas de palestras de auto-ajuda

Vou Imprimir
     Claro que uma boa impressora ajuda, mas não é essencial... mesmo com uma impressora monocromática você já pode imprimir seu papertoy, mas claro, prefira cores. Impressoras a lazer são até piores, prefira a boa e velha jato de tinta.
     Muito mais importante que a impressora é o papel que você vai imprimir. papel fotográfico, ou couchet podem parecer uma boa pedida, mas vão te dar um bruta dor de cabeça, prefira papeis mais ásperos com o sulfite.
     Cuidado com a gramatura. - Bebeu? que diacho de grama dura é essa? - Gramatura a grosso modo diz o quanto o seu papel é grosso, o sulfite mais usado tem 75g/m² (gramas por metro quadrado) e é muito fino, o melhor é trabalhar com pelo menos 90g/m² existem gramaturas melhores que vão de 110g/m² até 180g/m², se encontrar na sua cidade, opte por papel entre essas gramaturas

Já imprimi, bora cortar
     Não se apresse pequeno gafanhoto. Lembra das dua réguas? hora de usa-lás. Coma  ade metal, você vai passar com um pouco de força sobre cada linha que vai ser dobrada, a outra régua serve para você poder passar a régua de metal exatamente em cima da linha.
Tem que fazer isso?
sim


Comecei a colar e to rebocando tudo aqui
     Não aplique a cola diretamente sobre o papel, vai acabar indo cola demais e fazendo uma bruta meleca. coloque a cola em um pratinho, ou tampa de alguma coisa, e com o dedo espalhe a cola nas abas para colar.
"Valeu gênio agora cada vez que eu encosto no papel com os dedos cheios de cola sujo tudo."
para limpar os dedos de cola, basta esfregar um no outro, a cola seca e sai na hora.

Agora sim, bora imprimir, marcar vinco, cortar e montar